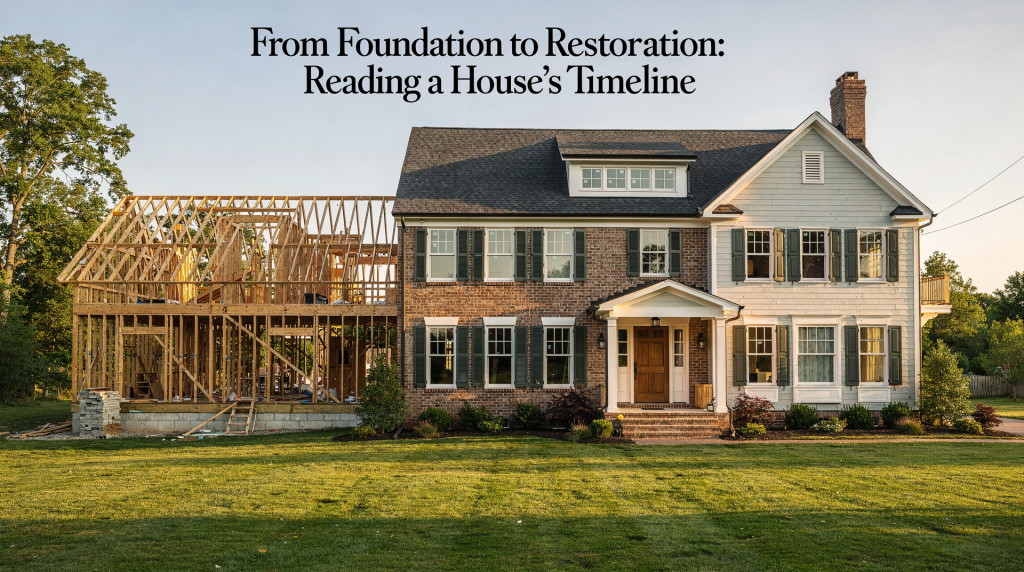
Every old house carries a timeline in its walls, floors, and repairs. If you know where to look, you can read that timeline and separate the original building from later changes, which is the key to understanding what the house is, what it has survived, and what kind of restoration it actually needs.
Why a house timeline matters
A house history is not just a list of former owners. It is the story of how the building was built, altered, repaired, neglected, and revived over time. That matters because good restoration depends on evidence, not guesswork. Over the years, I’ve found that the most reliable starting point is a triangulation of three evidence streams: documentary records, visual observation, and the physical clues embedded in the building itself.
For owners, this approach answers practical questions that surface on every project:
- What is original and what is later work?
- Which repairs are urgent and which are cosmetic?
- What period should a restoration respect?
- Where can modern systems be added without damaging historic fabric?
Without a timeline, you risk treating every old surface as sacred or, worse, ripping out a significant early feature because it looked “too rough.” I’ve seen both mistakes cost owners tens of thousands of dollars and erase irreplaceable evidence. The timeline is your insurance against that.
The basic stages in a house’s life
Most houses pass through recognizable phases. Some are easy to spot; others are hidden under later finishes. Recognizing these stages isn’t about forcing a single narrative—houses usually reflect many eras at once—but about giving each change its proper place in the sequence.
| Stage | What it often looks like | What it tells you |
|---|---|---|
| Original construction | Early framing, first plaster, initial window pattern, early foundation work | The house’s first design and materials |
| Early alterations | Rear additions, enclosed porches, new openings, updated trim | How the house adapted to new needs |
| Utility upgrades | New wiring, plumbing, heating, insulation | When modern systems were introduced |
| Repairs after damage | Patchwork masonry, replaced roof sections, reinforced floors | What failed and how often the house was stressed |
| Restoration | Careful repair of old finishes, matched materials, selective replacement | Which period a later owner chose to emphasize |
A good timeline does not force every change into one “style.” I’ve worked on houses where the 1840s core, 1890s kitchen wing, and 1920s sleeping porch all read as distinct chapters, and the restoration honored that layering rather than erasing it.
Step 1: Start with the building itself
The building usually gives the fastest clues. A careful walk-around can reveal where the house began and where it expanded later. I always begin with the exterior because later owners tend to invest their money in interior updates, leaving the shell as a more honest record of change.
Look at:
- Foundation changes
- Rooflines and dormers
- Chimneys and flues
- Window sizes and spacing
- Door locations
- Siding transitions
- Porch columns, brackets, and railings
- Visible seams between materials
- Different nail patterns, brick colors, or mortar joints
A simple rule helps: original work tends to look more integrated, while later additions often reveal themselves through a shift in materials, proportions, or workmanship. For instance, a section of clapboard with a slightly narrower exposure or a change from cut nails to wire nails can pinpoint a 20th-century alteration. I once identified a 1910s kitchen addition solely by the abrupt switch from hand-split lath to sawn lath visible in a closet.
What to note on a first exterior survey
- Where does the masonry change?
- Do windows line up consistently across the facade?
- Is one section of roof steeper or newer than another?
- Are there signs of a filled-in doorway or window?
- Does one addition sit on a different foundation type?
- Are decorative details repeated everywhere, or only on the front?
Step 2: Read the foundation first
The foundation is often the best place to understand the house’s earliest phase because later owners rarely redo it unless they must. Foundation materials can also reveal building campaigns: fieldstone, brick, poured concrete, block, or mixed repairs often point to different periods of work. I’ve crawled under more houses than I can count, and the foundation never lies—it just sometimes takes a while to interpret.
Signs to watch for:
- Different mortar colors or textures—a soft lime mortar next to a hard Portland cement patch tells you where a repair was made, and roughly when.
- Sump or drainage retrofits
- New concrete patches against older stone
- Structural cracks that were stabilized later
- Partial underpinning under one section only
A foundation may also show evidence of a vanished structure, such as an old porch, wing, cellar entrance, or outbuilding connection. These traces can be more useful than decorative features because they reflect how the house was actually built and used. I recall a project where a line of large, flat stones in the cellar floor turned out to be the footing of a long-gone summer kitchen, a detail that completely changed our understanding of the original service wing layout.
Step 3: Separate original fabric from later additions
This is where many house histories go wrong. Not everything old is original, and not everything newer is an intrusion. I’ve seen owners rip out 1920s built-ins because they “weren’t original” to an 1880s house, only to lose a layer of the house’s story that future owners would have valued. The goal is not to rank parts as “better” or “worse,” but to understand sequence.
Common clues that a feature is later
- Trim profiles that do not match the rest of the house—a Victorian ogee in a room full of plain beveled casings is a giveaway.
- Windows with different sash dimensions
- Floor boards running in a new direction
- Patch lines in plaster or drywall
- Stair details that feel less refined than the rest
- Framing members that interrupt an older wall system
Common clues that a feature is original
- Consistent material use across multiple rooms
- Wear patterns that fit the room’s layout—hollows in a threshold exactly where a door would have swung
- Structural elements that align from basement to attic
- Repeated handwork details in moldings, doors, and joinery—the same slight irregularity in a plane mark repeated across several doors tells you they came from the same craftsman’s bench
I always remind clients that originality isn’t a purity test. A house that’s been lived in for a century will have scars and upgrades. The key is knowing which scars are part of the house’s character and which are symptoms of a problem.
Step 4: Use documentary evidence to build the timeline
Physical clues are strongest when matched with records. Historic house research typically relies on deeds, tax records, maps, directories, photographs, floor plans, and local archives. I’ve spent countless hours in county record rooms, and the moment a deed description matches a physical seam in the foundation is one of the most satisfying in this work.
Useful records include:
- Deeds and title transfers
- Property tax assessments
- Sanborn maps and atlases
- City directories
- Census records
- Historic photographs
- Building permits, if available
- Newspaper notices and advertisements
- Oral histories from long-term neighbors or former occupants
Deed research is especially useful because it can create a chronological list of owners by tracing the property backward from the present owner to earlier transfers. Often, a deed will mention “the new addition” or “the brick wing,” giving you a dated anchor for a physical change.
Practical way to build a timeline
- Start with the current owner or parcel record.
- Work backward through deeds.
- Note every transfer date and name.
- Match those dates with maps, photos, and tax records.
- Add physical changes visible on the house.
- Keep separate notes for ownership, construction, and alteration.
Step 5: Interpret the interior with the same discipline
The inside of the house often reveals more than the exterior because later remodeling may not fully erase earlier structure. Architectural investigation usually includes interior and exterior documentation, plus an inventory of visible systems and finishes. I always start in the attic and basement—the spaces where structural honesty is highest—and work toward the main living areas.
Check:
- Floor plan symmetry and circulation
- Plaster thickness and repairs
- Ceiling heights from room to room
- Fireplace placement
- Stair configuration
- Trim profiles
- Door hardware
- Subfloor or attic framing
- Evidence of blocked openings
Interior clues that matter
- A room with a higher ceiling may indicate an added section.
- A fireplace off-center in one room may show a later partition.
- A stair that feels too narrow or steep may belong to an older plan.
- Repeated patching around one wall may signal former openings or built-in cabinetry.
I once traced a series of patched holes in an attic floor to a removed stovepipe system, which in turn explained a puzzling chimney configuration. Those small scars told the story of how the house was heated before central heating arrived.
Step 6: Understand the difference between damage and age
Not every flaw is historic character. Some are simple deterioration. Knowing the difference protects both the house and the budget. I’ve seen owners panic over a 150-year-old floor slope that was structurally stable, and others ignore a bulging wall that needed immediate attention. The timeline helps you distinguish the two.
Typical age-related conditions
- Settling cracks in plaster—often hairline and stable for decades
- Worn thresholds and stairs
- Soft mortar on old masonry
- Faded finishes
- Slight floor slope in older framing—usually less than 1 inch over 15 feet if the structure is sound
Typical problem conditions
- Active water intrusion
- Rotting sill plates
- Bulging walls
- Spalling brick
- Failed roof coverings
- Sagging structural members
- Mold from chronic moisture
A house timeline becomes especially valuable here because it shows whether a crack, patch, or water stain is a long-standing condition or a recent failure. A water stain that appears in a 1920s photo and hasn’t grown is very different from one that appeared after last spring’s storm.
Step 7: Map repairs onto a chronology
Once you have evidence, place each change on the timeline. This is the simplest way to turn research into a restoration plan. I keep a running list on every project, and it invariably becomes the most referenced document on site.
Example of a usable working timeline
- 1890s: original construction, brick foundation, front stair, central chimney
- 1920s: back kitchen addition, enclosed rear porch
- 1950s: electrical upgrade, replacement windows on service elevation
- 1980s: partial reroofing, interior drywall in service rooms
- 2010s: stabilization of settling foundation wall
- Present: restoration of sash, plaster repair, moisture control
This kind of timeline helps you decide what to preserve, what to repair, and what to replace. When we saw that the 1950s windows were on a secondary elevation and not original, we could replace them with energy-efficient units without guilt, while pouring resources into restoring the 1890s front sashes.
How a timeline guides restoration decisions
A house timeline is not only historical. It is a decision-making tool. On every project, I use it to keep the team focused on what matters and to prevent expensive detours into cosmetic work before the building is stable.
Use it to:
- Choose historically appropriate materials
- Avoid removing useful later layers too quickly
- Match repair methods to the period of the damage
- Prioritize structural issues before cosmetic ones
- Plan phased restoration when the budget is limited
A practical restoration order
- Stop water entry.
- Stabilize structure.
- Address roof, foundation, and drainage.
- Repair envelope details such as windows and siding.
- Restore finishes only after the building is dry and stable.
This order prevents expensive cosmetic work from being damaged by unresolved structural problems. I’ve seen too many freshly plastered walls ruined because a leaking gutter wasn’t fixed first.
Common mistakes when reading a house timeline
- Assuming the oldest-looking part is the original part
- Removing later alterations without documenting them
- Dating a house by style alone
- Treating every patch as a defect
- Starting interior finishes before structural repairs
- Ignoring additions because they are not “historic enough”
The best house histories are cautious. They accept uncertainty until evidence is strong enough. I’ve learned to say “the evidence suggests” rather than “this is definitely,” because a single new discovery—like a date scratched into a rafter—can upend a timeline you thought was solid.
A simple field checklist
Use this when you first evaluate a house.
- Walk the exterior and photograph each elevation.
- Note changes in materials, rooflines, and openings.
- Check the basement, attic, and crawlspace for structural clues.
- Record visible repair seams and patched areas.
- Compare the house against deeds, tax records, maps, and old photos.
- Separate original fabric, later alterations, and recent repairs.
- Build a dated timeline before planning restoration work.
When to bring in a professional
Some questions can be answered by a careful owner. Others need specialized help. I always tell owners that if you feel out of your depth, you probably are—and that’s okay. The cost of a consultation is far less than the cost of a structural mistake.
Call in a preservation architect, structural engineer, or experienced historic contractor when you see:
- Major settlement
- Foundation movement
- Wide or expanding cracks—anything over ¼ inch deserves a professional eye
- Persistent water intrusion
- Rot in load-bearing members
- Complex alterations that hide earlier structure
- Unclear evidence about what is safe to remove
Professional investigation often follows a basic sequence of research, documentation, inventory, and stabilization. I’ve worked with engineers who can date a foundation repair by the type of Portland cement used, and with architects who can spot a shifted lintel from across the room. Their expertise is worth every penny.
Conclusion
Reading a house’s timeline means learning to connect the physical building with the records that explain it. The foundation, framing, alterations, repairs, and restorations all leave evidence, and that evidence becomes the basis for better decisions. When you understand how a house changed over time, restoration stops being guesswork and becomes informed stewardship. In my experience, that shift is what turns a house into a home with a story you can trust.
FAQ
How can you tell the original part of a house?
Look for consistent structure, materials, and craftsmanship, then compare those clues with deeds, maps, photos, and tax records. For example, if the front two rooms share a continuous sill beam and hand-hewn joists, while the back room has sawn joists and a different foundation, you’re likely looking at an addition. Documentary evidence can then confirm when that addition happened.
What is the best place to start researching a house history?
Start with what is visible on the building, then move to deed records, tax assessments, and local archives. I always begin with a thorough photo survey and notes on every material change, then head to the county recorder’s office. The physical clues will guide your questions in the records.
Can later additions be historically valuable?
Yes. Additions can show how the house adapted to new families, technologies, and uses over time. A 1920s kitchen wing with original cabinetry tells a story of early electrification and changing domestic life that is just as significant as the 1880s parlor. I encourage owners to see these layers as part of the house’s biography.
What matters more in restoration: age or condition?
Condition comes first for safety and durability, but age and significance help determine what should be preserved. A structurally failing original window might need to be rebuilt using its old glass and profiles, while a 1950s replacement in poor condition might be replaced entirely. The timeline gives you the context to make that call.
Why is the foundation so important in house history?
It often preserves the earliest construction evidence and can reveal later structural repairs, additions, or vanished features. Because foundations are expensive and disruptive to replace, they tend to survive even when everything above them changes. I’ve found original builder’s marks, date stones, and even footprints of demolished wings by carefully examining the foundation.