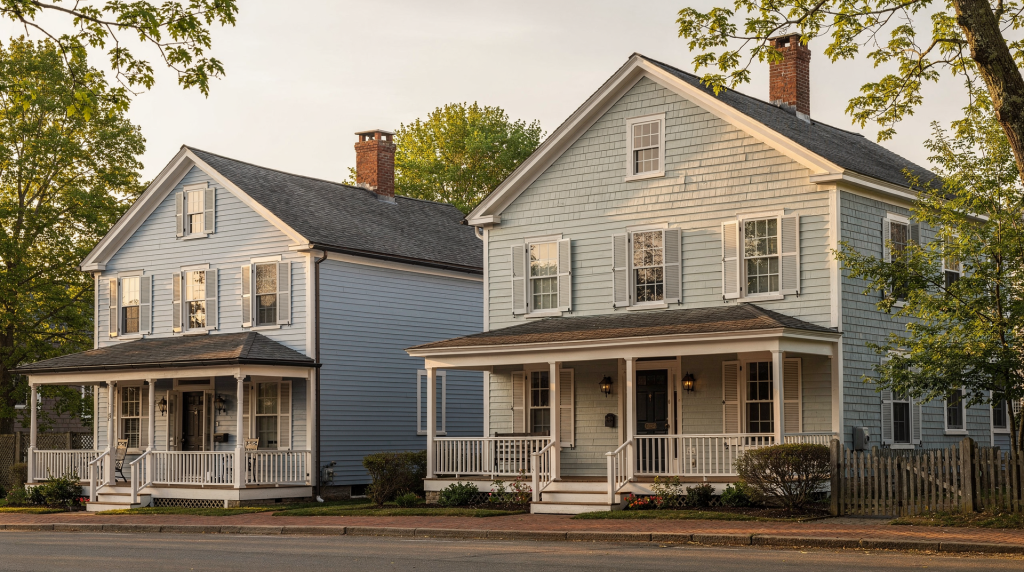
Walk through any village green in Massachusetts, Rhode Island, or coastal Maine, and the first thing that registers is the horizontal rhythm of clapboards—some painted a crisp white, others weathered to a silvery gray, many carrying the scars of three centuries of repairs. These houses are not just a regional trademark. They are a working archive of how ordinary builders solved an extraordinary problem: keeping a timber frame dry through nor’easters, January thaws, and the relentless damp of a maritime climate. The story of New England clapboard houses is not a static tale of quaint siding. It is a continuous negotiation between available materials, shifting skills, and the unromantic demands of weather.
What Makes a Clapboard House a Clapboard House?
At its most literal, a clapboard house is one sheathed in horizontal wooden boards, each course lapping over the one below like a shingled roof turned on its side. The geometry is simple but effective: water hits the surface, runs down, and drips off the lower edge of each board without ever reaching the vulnerable sheathing or frame behind. In New England, this system became so dominant that the siding often gets confused with the house itself.
In practice, the term needs careful unpicking. Clapboard is the exterior skin, not the building type. A saltbox, a Cape Cod cottage, and a formal Georgian center‑hall house can all wear clapboards, but their plans, massing, and structural logic differ profoundly. I have walked through too many houses where an owner proudly calls their home “a clapboard” when they mean a Cape with original 18th‑century siding—or, just as often, a 1920s Colonial Revival with machine‑sawn replacements. The distinction matters because it shapes every decision about preservation. A house can be historically significant even if its clapboards were replaced in kind a century ago, but you cannot treat a 1980s cedar bevel siding the same way you would treat a set of riven white pine boards from 1720.
Why Clapboard Became So Common in New England
Clapboard did not become ubiquitous by accident. It won out over brick, stone, and shingle because it answered a specific set of regional constraints better than any alternative. The climate was the first filter: long winters with freeze‑thaw cycles, driving rain, and salt‑laden winds demanded a layered, resilient skin. The second filter was the forest. Early settlers found themselves surrounded by old‑growth eastern white pine, oak, and chestnut—tall, straight trunks that could be split into remarkably durable boards with little more than a froe, a mallet, and a steady hand.
Those first clapboards were riven, not sawn. Splitting follows the grain, leaving the wood’s natural resin channels intact and creating a surface that sheds water far better than a rougher, sawn face. I have handled original 17th‑century clapboards with a slightly wavy, almost polished surface that still repels moisture after 300 years. As water‑powered sawmills multiplied in the 18th and 19th centuries, production shifted to sawn boards—faster to make, more uniform, but inherently more porous. The trade‑off was accepted because mills could supply the growing demand, and paint technology was improving to compensate for the loss of natural water resistance.
The practical advantages stacked up quickly: clapboards shed water efficiently, they could be made from local timber with minimal processing, they worked seamlessly with the region’s timber‑frame tradition, they allowed for sectional repairs without dismantling an entire wall, and they gave even a modest one‑room house a finished, “civilized” appearance that mattered deeply in a society where domestic order was a moral value.
Early New England Houses and the Colonial Beginning
The earliest New England houses were survival machines: one‑room plans with massive central chimneys, low ceilings to conserve heat, and almost no ornament. Many started as little more than framed boxes sheathed in clapboards directly over the studs, without sheathing or any intermediate layer. I have documented houses where the original riven clapboards were nailed straight to the posts, and you can still see the ghost of the framing through the siding.
In the 17th and early 18th centuries, clapboard became the default exterior for colonial domestic building from the Connecticut River Valley to the Penobscot Bay. These houses rarely arrived fully formed. They grew in fits and starts: a lean‑to added at the rear, a second story raised under a steeper roof, a kitchen ell tacked on when the family prospered. The siding often tells that story more honestly than any document. A sudden change in board width, a shift from hand‑wrought to cut nails, or a patch of mismatched paint can pinpoint exactly where and when an addition occurred. I once traced a 1740s Cape that had been expanded in three distinct campaigns simply by mapping the nail patterns and the weathering lines on the north elevation.
How a Traditional Clapboard House Was Built
A clapboard house is only as good as the assembly behind it. The siding is the outermost layer of a system that, when it works, manages moisture, air, and structural loads as a single unit. When it fails, it usually fails because someone disrupted that system without understanding the consequences.
The classic New England wall assembly, from the inside out, starts with the interior finish—often plaster on wood lath in earlier houses, later drywall or beadboard. Behind that is the timber frame, typically oak or pine, joined with mortise‑and‑tenon connections secured by wooden pegs. On the exterior face of the frame, builders applied sheathing: wide, rough‑sawn boards nailed horizontally or diagonally to stiffen the structure and provide a nailing base for the clapboards. In the 19th century, a layer of building paper or asphalt‑impregnated felt often appeared between sheathing and siding, though early houses relied on the tight overlap of the clapboards themselves and, in some cases, a parge coat of lime mortar on the back of the boards. Finally, the clapboards went on, each course lapped by a consistent exposure—typically 4 to 6 inches—and fastened with nails driven through the thicker bottom edge of the board above.
Typical Layering, from inside out
| Layer | Purpose | What to watch for today |
|---|---|---|
| Interior finish | Protects and finishes rooms | Cracks, patchwork, historic plaster movement; look for keys broken behind the lath, which often signals structural movement or moisture cycling. |
| Framing | Structural support | Sagging, rot at sills and posts, powderpost beetle or termite damage; check mortise pockets for crushed fibers that indicate long‑term overloading. |
| Sheathing | Stabilizes wall and supports siding | Open joints, failed boards, diagonal boards that have pulled away from the frame; missing sheathing behind later additions is a red flag. |
| Moisture layer | Reduces water intrusion in later work | Missing or trapped moisture; asphalt felt can become brittle and crack, while early tar papers sometimes hold water against the sheathing. |
| Clapboards | Weather barrier and visual finish | Cupping, split ends, paint failure, rot at lower courses; the bottom 12 inches of a wall typically shows the first signs of splashback damage. |
In houses that have stood for two centuries, the clapboards you see are often the third or fourth generation. That is not a defect—it is evidence of ongoing care. The critical question is whether the current boards are historic fabric worth preserving or later replacements that can be altered without losing significant material. I always look for tool marks: the faint scalloping of a drawknife on the back of a board, the irregular spacing of hand‑wrought nails, the slight taper that indicates a board was split rather than sawn. Those details are irreplaceable.
Common New England Clapboard House Forms
Clapboard siding appears on everything from fishermen’s cottages to merchant mansions, but three forms are so closely associated with the region that they have become visual shorthand for “New England house.”
Saltbox houses
Saltbox houses are the most sculptural of the group: two full stories in front, a single story in back, and a long, unbroken roof slope that drops almost to the ground. The form usually developed incrementally, as a family extended the rear of a standard two‑story house to gain kitchen space or storage. The clapboard exterior does more than cover the frame—it emphasizes the dramatic profile and often reveals the seam where the original house ended and the lean‑to began. I have stood in attics where the original rear wall, complete with its clapboards and weathered paint, survives inside the later addition, a hidden record of the house’s growth.
Cape Cod houses
Cape Cod houses are the compact, symmetrical workhorses of the New England landscape. A typical full Cape has a central chimney, a steep roof, and a five‑bay facade with a central door, all wrapped in clapboards. The form is so efficient that it changed little from the late 17th century through the mid‑19th century, and it was revived with almost religious fervor in the 20th‑century Colonial Revival. When people picture a “classic New England house,” they are usually picturing a Cape with painted clapboards, small‑paned windows, and a weathered cedar shingle roof. The clapboards on these houses tend to be narrower and more finely milled than on earlier saltboxes, reflecting both improved milling and a growing taste for refinement.
Georgian and later colonial revival houses
More formal New England houses also adopted clapboard, especially as the region’s economy matured. A Georgian center‑hall house with a pedimented doorway, pilasters, and a modillion cornice might still be sheathed in clapboards, but the boards would be thinner, the exposure more regular, and the paint more carefully maintained. In these houses, clapboard ceased to be a merely practical skin and became part of a deliberate architectural composition. The Colonial Revival of the early 20th century took this further, often using clapboards with a machined precision that earlier builders could not have achieved—and, in the process, creating a new kind of historic fabric that now deserves its own careful preservation.
How Clapboard Changed Over Time
The history of clapboard is really a history of three overlapping technologies: hand splitting, machine sawing, and paint formulation. Each shift left its mark on the buildings.
1. Hand-split clapboards
Early boards were riven from straight‑grained logs, usually white pine or chestnut. A skilled workman with a froe could produce boards that followed the grain perfectly, yielding a piece that was strong, stable, and naturally resistant to water. These boards often have a slight wedge shape in cross‑section—thicker on one edge—and a surface texture that feels almost polished. Installing them required experience: each board had to be laid so that the thicker edge was at the bottom, creating a shadow line that helped the wall read as a series of crisp horizontals. The labor was intense, but the result could last a century or more with minimal maintenance.
2. Sawn and milled clapboards
As sawmills became common in the 18th and 19th centuries, clapboards grew more uniform. A water‑powered sash saw could cut boards faster than a man with a froe, and by the 1830s, steam‑powered circular saws were producing clapboards by the wagonload. The boards became thinner, the exposure more consistent, and the profile shifted from a wedge to a flat board with a beveled bottom edge. This standardization made clapboards cheaper and easier to install, but it also made them more dependent on paint for protection, because the sawn surface was more absorbent than a riven one.
3. Painted clapboards
Paint was never optional in New England—it was a structural necessity. Early paints were based on linseed oil and ground pigments, often mixed on site. White lead paint became common by the early 18th century, prized for its durability and its ability to reflect heat. But the familiar white New England village is partly a 19th‑ and 20th‑century invention. Earlier houses were frequently painted in muted earth tones: red ochre, Spanish brown, gray, sage green, or a deep chocolate brown. I have uncovered original paint layers on 18th‑century clapboards that reveal a much more colorful streetscape than the white‑clapboard myth suggests. The choice of color was often dictated by available pigments, local fashion, and the owner’s willingness to pay for imported ingredients like Prussian blue or chrome yellow.
What To Look for in a Historic Clapboard House
If you own, restore, or evaluate one of these houses, the siding can tell you more than any set of deeds. You just have to learn to read it.
Key clues in the exterior
- Board width variation may indicate different campaigns of repair or replacement. A sudden jump from 6‑inch to 4‑inch exposure often marks a 19th‑century upgrade.
- Irregular nail patterns can show replacements or earlier siding layers. Hand‑wrought nails with rose‑shaped heads are pre‑1800; cut nails with rectangular heads date from roughly 1800 to 1890; wire nails after that.
- Paint ridges and old colors help identify historic periods. A cross‑section of paint layers under a microscope can reveal the original color and subsequent repainting campaigns.
- Rot at the bottom courses often signals splashback, poor grading, or failed gutters. The bottom board should be at least 8 inches above grade; less than that invites decay.
- Warping or cupping may mean moisture is trapped or boards were installed without enough room to move. Clapboards need to expand and contract; tight butt joints can force them to cup.
- Patch repairs may be honest and useful if they preserve most original material. A well‑executed Dutchman patch in a sound board is far better than replacing the whole board.
Interior clues that connect to the siding
- Settling cracks near additions often correspond to exterior changes. A diagonal crack above a window on an interior wall may align with a joint in the clapboards outside where an addition was attached.
- Old framing lines may show where a wall was raised or shifted. Look for ghost marks on the sheathing or changes in the lath pattern.
- Chimney placement can help date the original house form. A massive central chimney with multiple fireplaces suggests a 17th‑ or early 18th‑century core.
- Window openings can reveal whether siding was altered around new trim or enlarged openings. Original clapboards often butt against the window casing; later replacements may be notched around it.
Restoration Principles That Matter Most
Restoring a clapboard house is not about making it look new. It is about stopping active deterioration while keeping as much historic material as possible. Every time you remove an original board, you erase a piece of the building’s physical record.
Best-practice priorities
- Fix water first. Repair flashing, gutters, roof edges, and grading before touching siding. I have seen too many expensive siding replacements fail within five years because the real problem was a clogged downspout or a roof leak that saturated the wall from above.
- Preserve sound wood. If a board is stable, keep it. Even a board with surface checking or minor end splits can often be consolidated with epoxy or simply left alone. Replace only what has failed beyond repair.
- Match the profile. New boards should match the reveal, thickness, and exposure of the original. A modern ½‑inch bevel siding will look wrong against ¾‑inch historic clapboards and will create a visible step in the wall plane.
- Use compatible materials. Hard, brittle modern treatments—like some elastomeric coatings—can trap moisture and cause more damage than they prevent. Traditional oil‑based paints allow the wood to breathe; many modern acrylics do too, but the system must be chosen carefully.
- Paint correctly. Bare wood must be dry (below 15% moisture content) and properly prepared. Scrape, sand, and prime within days of exposure. Never paint over damp wood or active rot.
Common Mistakes Homeowners Make
Even careful owners can damage historic clapboards by treating them like disposable siding. The most frequent errors I encounter in the field include:
- Replacing whole walls when only a few courses have failed. A selective repair that saves 80% of the original material is almost always the better choice.
- Installing vinyl or incompatible coverings over original wood. Vinyl traps moisture, hides ongoing decay, and destroys the subtle shadow lines that give a clapboard wall its character.
- Caulking joints so tightly that moisture gets trapped. Clapboards need to drain and dry; sealing every seam can turn the wall into a terrarium.
- Painting over damp wood. The paint will peel within a season, and the trapped moisture will accelerate rot.
- Ignoring roof runoff and splashback. A missing gutter or a downspout that discharges against the foundation can destroy the bottom courses in a single winter.
- Using pressure washing aggressively. High‑pressure water drives moisture deep into the wood, erodes soft grain, and can strip away fragile historic paint layers.
- Mixing random replacement boards that destroy the visual rhythm of the facade. A single board of the wrong width or exposure can catch the eye from across the street.
Maintenance Checklist for Clapboard Houses
A well‑maintained clapboard house is easier and cheaper to preserve than a neglected one. The key is regular, small interventions rather than crisis‑driven overhauls.
Seasonal checklist
- Inspect paint and caulk lines in spring. Look for hairline cracks, alligatoring, or peeling that exposes bare wood.
- Check the lower courses after heavy rain. Probe with a dull awl for soft spots, especially at corners and near downspouts.
- Keep gutters clear and functional. A single clogged gutter can saturate an entire wall section.
- Trim plants away from siding. Shrubs and vines hold moisture against the boards and prevent drying.
- Watch for peeling paint near windows and roof intersections. These are the first places where water gets behind the siding.
- Look for soft spots at corners, sills, and porch connections. End grain absorbs water like a straw; check these areas every season.
- Repaint before bare wood is widely exposed. A small touch‑up now prevents a major stripping job later.
Annual checklist
- Walk the perimeter and photograph problem areas. A dated photo record is invaluable for tracking changes over time.
- Check for insect activity or new rot. Look for frass (fine sawdust) from powderpost beetles or mud tubes from termites.
- Confirm that downspouts discharge well away from the foundation. Extensions or splash blocks are cheap insurance.
- Review whether repairs from previous years are holding up. A patch that looked good last year may be failing now if the underlying moisture issue was not fully resolved.
- Note any new settlement cracks or warped boards. Document them with measurements and photographs before deciding on a repair strategy.
When To Repair and When To Replace
This is one of the hardest judgment calls in preservation. The default should always be repair, but there are clear cases where replacement is the only sensible option.
| Condition | Usually repair | Usually replace |
|---|---|---|
| Surface checking | Yes | No |
| Small split end | Often | Only if structurally failed |
| Limited rot at one end | Often | Not if sound wood remains |
| Soft, crumbling board | Rarely | Yes |
| Repeated failed patches | Maybe, after moisture source is fixed | If deterioration is widespread |
| Historic board with tool marks | Strongly prefer repair | Replace only as a last resort |
A good rule: if the board still contributes to the building and can be stabilized, preserve it. I have spent hours consolidating a single 12‑inch section of original clapboard with epoxy and Dutchman patches because it bore the drawknife marks of the man who installed it in 1760. That board is a document, and once it is gone, that information is lost forever.
How Clapboard Houses Express New England Identity
Clapboard is more than a technical siding choice. It became part of the region’s visual language, as central to the image of New England as stone walls and white steeples. The combination of horizontal boards, restrained trim, steep roofs, central chimneys, and compact massing shaped what people now think of as “New England character.”
That character, however, was never static. A modest colonial house, a later Federal‑era home with elliptical fanlights, and a 20th‑century Colonial Revival with a two‑car garage all use clapboard differently. The material remained familiar even as design ideals changed. What ties them together is not a single style but a shared approach: an honest expression of structure, a respect for proportion, and a willingness to let the siding age gracefully. In the best examples, the clapboards are not a costume; they are the building’s skin, showing every repair, every repainting, every adaptation to the demands of the site.
Practical Tips for Owners and Researchers
If you are documenting a clapboard house, start with what you can observe before making assumptions. The physical evidence is almost always more reliable than local tradition.
Good first steps
- Photograph each elevation in even, overcast light. Direct sunlight creates shadows that can hide cracks and patches.
- Measure clapboard exposure and board width at multiple points. Record the data on a sketch plan.
- Note where siding changes color, size, or texture. These transitions often mark additions or repair campaigns.
- Compare nail types and hole patterns. A magnet can help distinguish between iron and later steel nails.
- Look for evidence of removed porches, additions, or altered windows. Ghost lines in the clapboards, patched nail holes, or changes in paint sheen are all clues.
- Check local records, deeds, and historic photos for earlier configurations. A single photograph from 1890 can answer questions that the building itself cannot.
Useful questions to ask
- Are the boards original, repaired, or replaced? The answer may vary from wall to wall.
- Is the current paint system protecting or trapping moisture? A gloss meter and a moisture meter can give you objective data.
- Has the siding been altered for insulation, storms, or additions? Look for telltale signs like foam insulation squeezed into joints or modern caulk.
- Do repairs respect the building’s original scale? A patch of 3‑inch exposure clapboards on a house with 5‑inch exposure will always look like a mistake.
Why This History Still Matters
Understanding New England clapboard houses helps owners make better decisions. It prevents unnecessary replacement, guides accurate repair, and reveals how a house changed over time. More importantly, it shows that historic homes are not frozen objects; they are working buildings shaped by climate, craftsmanship, and generations of care.
When you stand in front of a 250‑year‑old clapboard house and see the slight wave in the boards, the ghost of a removed porch, the patch where a window was once smaller, you are looking at a cumulative record of human decisions. That record is worth reading carefully before you pick up a hammer or a paintbrush. The goal is not to erase the passage of time but to ensure that the house can continue to tell its story for another century.
FAQ
What is the difference between clapboard and shingle siding?
Clapboard uses overlapping horizontal boards, typically 4 to 6 inches in exposure, while shingles are thinner, smaller units—usually cedar—that overlap like scales. Shingles are more common on coastal houses and in the later 19th century, but many houses combine both: clapboards on the front and shingles on the sides and rear. The two systems manage water differently, and mixing them requires careful detailing at the transitions.
Are all New England historic houses clapboard?
No. Many are, especially in rural and village settings, but brick, stone, shingles, and later synthetic siding also appear across the region. Brick was more common in urban areas and among wealthier builders; stone appears where local geology provided suitable material; shingles dominate in certain coastal communities. Clapboard’s dominance is a story of practicality and availability, not exclusivity.
Why are so many clapboard houses painted white?
White became associated with cleanliness, formality, and later Colonial Revival taste, but historic paint colors were more varied than many people assume. White lead paint was durable and reflective, which helped it become a default by the mid‑19th century. However, earlier houses were often painted in ochres, reds, grays, and greens. The “white New England village” is partly a 20th‑century aesthetic that was retroactively applied to earlier periods.
Can original clapboards be preserved if they are peeling?
Often yes. Peeling paint does not automatically mean failure. The board may only need moisture correction, surface prep, and repainting. I have saved many boards that looked terrible but were fundamentally sound once the loose paint was scraped and the wood was allowed to dry. The key is to find and fix the moisture source before repainting.
Is it acceptable to replace damaged clapboards with modern lumber?
Yes, if the replacement matches the original profile and the historic board cannot be repaired. Modern white pine or cedar can work well, but the board must be milled to the same thickness, exposure, and bevel as the original. Material choice and detailing matter more than convenience. Avoid pressure‑treated lumber in historic applications; it often contains chemicals that can react with old wood and fasteners.
Conclusion
New England clapboard houses endure because they are practical, adaptable, and deeply tied to the region’s building history. Their siding records weather, repair, growth, and changing taste in a language that anyone can learn to read. For owners and preservation‑minded readers, the lesson is simple: read the house carefully, protect what survives, and repair with respect for the building’s original logic. The clapboards are not just a covering; they are the house’s memory, written in wood.