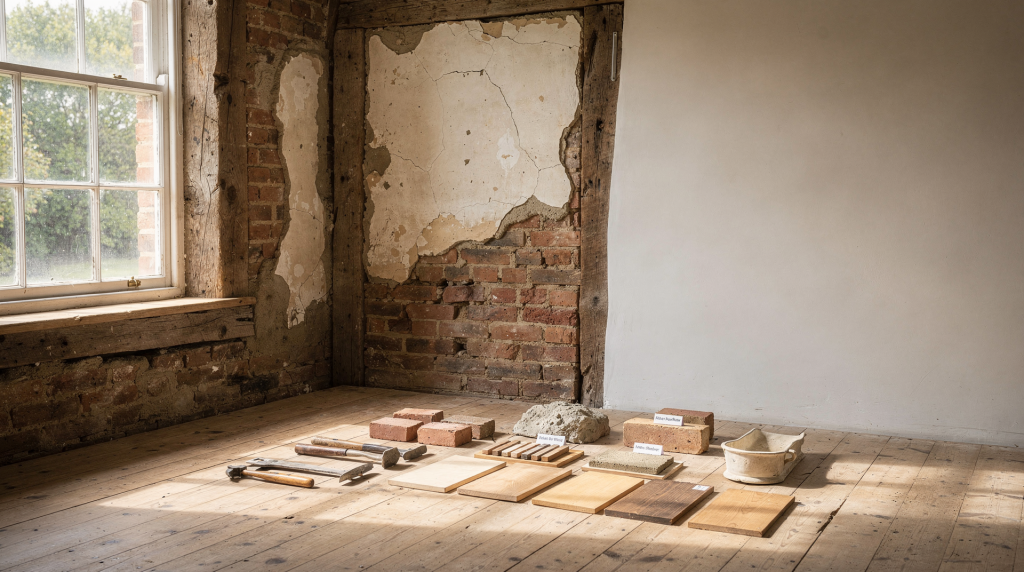
Original materials are the fastest way to read a historic house accurately. They tell you when a building was likely made, how it was constructed, what kind of repairs it has survived, and which parts still deserve careful preservation. When I walk into an old house for the first time, I head straight for the basement or the attic—the places where later renovations rarely reach. There, the original framing, the rough brickwork, the hand-cut nails still hold the story of the building’s first day. If you own or study an older home, the materials are not just decorative details. They are evidence.
Why original materials matter
Historic houses often change over time—walls get moved, windows swapped, cladding covered up—but original materials remain the most reliable clues to the building’s first life. The condition, composition, and finish of those materials can reveal:
- the approximate construction period
- the skill level and available trades of the original builders
- later alterations and repairs
- moisture damage, structural movement, or past neglect
- which elements are most important to retain during restoration
I’ve dated a house to within a decade just by the combination of rose-head nails and a particular lime mortar mix. The slight irregularity of hand-planed floorboards tells you about the pace of work and the tools available, while a patch of Portland cement in a fieldstone foundation points directly to a 1920s repair campaign. That kind of layered information is why preservation guidance consistently emphasizes repair, documentation, and matching replacement materials as closely as possible when replacement is unavoidable. Every original surface is a document; once it’s gone, that page is torn out forever.
What different original materials can tell you
Wood siding and trim
Original wood siding often indicates the home was built before synthetic cladding became common, but the exact board profile can say much more. Narrow clapboards with a thin, tapered edge, beveled siding with hand-plane marks, and trim with slight variations in width all point to earlier construction and more labor-intensive craftsmanship. On a federal-era house I studied, the clapboards still showed the scalloped signature of a drawknife, and the nail heads were set in a neat, rhythmic pattern that spoke of a skilled hand.
Look for:
- hand tooling—adze marks on the back of boards, plane tracks on the face
- uneven dimensions—widths that vary by an eighth of an inch or more
- old nail patterns—wrought nails with irregular heads, cut nails with a distinct rectangular shank
- paint buildup showing previous color schemes—scraping a small, hidden area can reveal a chronology of ochres, whites, and grays
- repairs made with different wood species or modern fasteners—a patch of pine in an otherwise chestnut clapboard, or a Phillips-head screw, signals a later fix
A house that still has its original wood siding may retain more of its historic fabric than one that has been heavily covered or wrapped. Preservation guidance recommends repairing and retaining original siding whenever possible—not just for authenticity, but because old-growth wood is often denser and more rot-resistant than modern stock.
Brick and mortar
Brick can be especially useful for dating a house. Handmade or early fired bricks are often slightly irregular in size and shape, with a softer, more porous surface and sometimes even fingerprints or straw impressions from the molding process. Later machine-made brick tends to be uniform, harder, and sharper-edged. I once examined a chimney where the bricks transitioned from irregular, salmon-colored units at the base to precise, red bricks near the top—clear evidence of a later height extension.
Mortar is just as revealing:
- lime mortar—soft, white or buff, with visible sand aggregate—usually signals earlier construction
- Portland cement mortar—gray, hard, and often brittle—is typically later
- shell or crushed-brick aggregate can indicate older, traditional regional mixes
This matters because replacing lime mortar with hard cement can trap moisture and damage soft historic brick. I’ve seen entire brick facades spalled and crumbling because a well-meaning contractor repointed with a high-cement mix in the 1960s. The material mix tells you not only when the house may have been built, but also whether previous repairs were appropriate—and what you need to do to undo the damage.
Plaster
Original plaster often shows how walls were built before drywall became standard. Traditional lime plaster, applied over hand-split lath, reveals the rhythm of the building’s framing through subtle undulations and hairline cracks that follow the studs. It’s a living map of structural movement. On a Greek Revival house, I found three distinct plaster campaigns: the original 1840s coat with horsehair binder, a 1890s skim coat with a slightly different tint, and a 1940s gypsum patch around a new electrical box. Each layer told a story of changing use.
What to look for:
- hairline cracks that follow framing movement—often harmless, but a sudden diagonal crack might mean active settlement
- layered finishes or wallpaper remnants—old wallpaper can be dated by pattern and printing technique
- keying marks from lath—the small, squeezed-through bumps on the back of a fallen piece confirm original lath-and-plaster construction
- patching that differs in texture from surrounding surfaces—a smooth, hard patch in an otherwise sandy lime finish is a red flag for incompatible gypsum
Plaster is worth preserving because it is part of the house’s original interior system, not just a finish coat. It regulates humidity, provides sound insulation, and carries the tactile memory of the building’s making.
Windows and glass
Windows are among the best indicators of age and alteration. Original sash proportions, muntin profiles, and glass irregularities can reveal the period of the house more accurately than a later remodel. I often find that a house with replacement windows still has one original sash in a closet or attic—and that single survivor holds the key to the original design. The thin, elegant muntins of an early-19th-century sash, for instance, are almost never replicated correctly in modern units.
Clues include:
- wavy or bubbly glass—cylinder glass, common before the 1920s, has a distinct ripple and occasional seed bubbles
- hand-cut or irregular panes—edges may be slightly curved or show chipping from a glazier’s diamond
- early wood sash with narrow members—the profiles are often delicate, with a lamb’s tongue or ogee detail
- paint buildup that shows older sash lines—ghost marks on the frame where the original sash sat
- patched muntins or replaced lower sashes—a common repair where the bottom rail rotted and was spliced in
Historic glass and window components are often repairable, and original windows usually carry more material value than modern replacements. I’ve restored sashes that were painted shut for decades, and once the old growth wood was freed and the glazing compound renewed, they operated smoothly and sealed well.
Hardware, nails, and fasteners
Small details often tell the clearest story. In a house that has been remodeled several times, the hardware is like a timeline you can hold in your hand.
Examples:
- hand-forged nails—irregular, faceted heads and tapered, square shanks—can suggest very early construction, typically before 1800
- cut nails—with a rectangular shank and a flat head—are common in 19th-century work, roughly 1800 to 1890
- wire nails—round shank, uniform head—usually indicate later work, after about 1890
- machine-made hinges, locks, and latches may show a renovation phase; the style of the stamp or the type of screw can narrow the date
- mismatched screws or newer fasteners often mark repair campaigns—a slot-head screw in a hinge that otherwise has square-cut nails is a telltale sign
These details help separate original work from later interventions and can confirm whether visible changes are consistent with the home’s supposed era. I once used a single hand-forged nail found in a basement beam to push a house’s construction date back by thirty years, which changed the entire historical narrative.
Roof materials
Original roofing materials can reveal both age and climate adaptation. Slate, wood shingles, and metal roofs each reflect different budgets, regions, and maintenance patterns. A later roof replacement may hide earlier framing or roof pitch changes, but the attic almost always holds clues. I’ve crawled through attics where the original cedar shingles were still in place under a later tin roof, perfectly preserved in the dark.
Look for:
- surviving roof structure in the attic—original rafters, purlins, and ridge boards, often with carpenter’s marks
- evidence of earlier flashing—old copper or lead remnants at the eaves or chimney
- nail holes from past roofing layers—a pattern of small, square holes suggests wood shingles; larger, round holes might be from slate
- old gutters, eaves, or cornice details—built-in gutters, for example, are common in certain periods and can be a maintenance headache if ignored
Roof features are important because water intrusion is one of the biggest threats to historic fabric. A small leak at a poorly flashed chimney can rot the entire roof structure over a few decades, and understanding the original roofing system helps you design repairs that work with the building, not against it.
How to read original materials without damaging them
Start with observation, not removal. Preservation best practice is to document before disturbing anything. I always carry a bright flashlight, a magnifying loupe, and a camera—and I spend at least an hour just looking before I touch anything.
A practical inspection sequence
- Photograph every surface before touching it. Wide shots and close-ups, with a scale reference.
- Note where materials change: siding, trim, mortar, plaster, flooring, hardware. Changes often align with additions or repairs.
- Look for irregularities, not just damage. A slight bulge in a plaster wall might indicate a former doorway; a patch of different brick might be a filled-in window.
- Compare left and right sides of the house for symmetry and repeated patterns. Asymmetry often reveals later extensions.
- Check attics, basements, closets, and utility spaces for untouched fabric. These are the archives of the house.
- Record patches, seams, plugged holes, and abandoned openings. Each one is a scar that tells a story.
- Only then decide whether samples or professional analysis are needed. A careful visual survey often answers more questions than a quick renovation tear-out.
Material clues and what they usually suggest
| Material or feature | What it may reveal | Why it matters |
|---|---|---|
| Handmade brick | Earlier construction or local production | Helps estimate age and region; local clay colors and firing marks are distinctive |
| Lime mortar | Traditional masonry work | Indicates compatible repair needs; using hard cement will cause damage |
| Wavy glass | Older window sash | Supports period identification; cylinder glass dates before the 1920s |
| Cut or hand-forged nails | Early building phase | Helps separate original from later work; nail technology changed rapidly |
| Original wood siding | Surviving historic fabric | Often worth repairing rather than replacing; old-growth wood is superior |
| Lime plaster | Earlier wall system | Guides repair methods and finish matching; it’s breathable and repairable |
| Original hardware | Period craftsmanship | Helps date upgrades and renovations; style and fasteners are key |
Common mistakes when judging original materials
Assuming anything old is automatically original
Many houses contain recycled or reused materials. A Victorian home may have later windows, patched brick, or replacement trim that looks older than it is. I’ve seen a Colonial Revival house with salvaged 18th-century doors that confused everyone until we checked the hinges. Always cross-reference multiple material clues.
Replacing instead of repairing
Historic guidance strongly favors repair, stabilization, and compatible replacement only when necessary. I’ve watched owners rip out original windows because they were “drafty,” when all they needed was new glazing putty and weatherstripping. The loss is irreversible.
Using incompatible modern materials
The wrong mortar, paint system, or cladding can damage old fabric faster than age itself. A latex paint over lime plaster traps moisture and causes peeling; a cement stucco over soft brick can crack and spall within a few freeze-thaw cycles. Always match the physical properties of the original.
Ignoring later changes
Later additions are part of the house’s history too. Sometimes they have significance of their own and should be documented before removal. A 1950s kitchen might not be “historic,” but its linoleum and metal cabinets tell the story of mid-century modernization. Removing them without record erases a layer of the building’s life.
When to call a specialist
A preservation architect, historic contractor, or materials conservator is worth involving when:
- the masonry is crumbling or repointed with hard cement—a mortar analysis can determine the original mix and guide proper repointing
- the plaster is failing across multiple rooms—large-scale consolidation or reattachment requires experience with lime
- original windows are stuck, rotted, or badly altered—a skilled joiner can splice in new wood and restore operation
- there is evidence of structural movement—cracks wider than 1/8 inch, sagging floors, or bowed walls need an engineer’s assessment
- you suspect hidden damage behind finishes—a moisture meter and thermal imaging can reveal what the eye can’t see
- the house may qualify for formal historic review or preservation restrictions—early consultation can prevent costly missteps
Laboratory analysis may also be appropriate when you need to identify paint layers, mortar composition, or hidden construction phases. A small sample of mortar can be analyzed for binder type and aggregate, giving you a recipe for a perfect match.
A simple owner checklist
Use this before any repair project:
- Document original materials with photos and notes—create a room-by-room inventory of what’s original and what’s not
- Identify the materials you have, not just the ones you want to replace—understand their condition and significance first
- Separate original fabric from later alterations—this helps you prioritize what to protect
- Check for moisture sources before repairing finishes—fix the leak, then the plaster
- Match repair materials in composition, texture, and appearance—use lime for lime, wood for wood, and match the grain and tooling
- Save samples and removed pieces for reference—label them with the location and date; they’re invaluable for future work
- Prioritize maintenance over replacement—clean gutters, repaint, and repoint before things fall apart
Why this knowledge improves restoration
Understanding original materials keeps a restoration grounded in the actual building instead of in guesswork. It helps owners choose repairs that protect historic character, avoid costly mistakes, and preserve more of the house’s authentic fabric. I’ve seen too many projects where a lack of material knowledge led to the loss of irreplaceable features—a hand-planed mantel painted over with thick latex, a soft-brick wall repointed with hard cement that spalled within a year.
In practical terms, original materials tell you what the house was, what has happened to it, and what it can still become without losing its history. When you know how to read them, you’re not just fixing a building; you’re continuing a story that began when the first foundation stone was laid.
FAQ
How can I tell if a material is original or a later replacement?
Look for differences in size, texture, fasteners, tool marks, paint layers, and wear patterns. Original material usually matches surrounding historic fabric more closely than later repairs do. For example, original floorboards will have consistent wear in the traffic paths, while a replacement board might be slightly thicker or have machine-planed surfaces. Check the nails: if the rest of the room has cut nails and a board has wire nails, it’s a replacement. Also, examine the back of trim or siding where it’s hidden—original pieces often have rough, hand-tooled backs, while replacements are smooth.
Do original materials always need to be preserved?
Not always. If a material is severely deteriorated—say, a sill that has rotted through or plaster that has lost its key and is pulling away from the lath—replacement may be necessary. The key is to match the old material in composition, design, color, and texture as closely as possible. Even then, save a sample of the original for documentation. The goal is to retain as much historic fabric as is practical, but safety and structural integrity come first.
Are original windows worth keeping?
Yes, when they are repairable. Original windows often preserve the home’s proportions and craftsmanship, and they can usually be restored more successfully than many owners expect. I’ve worked on sashes that were painted shut for fifty years; after stripping, repairing joints, and reglazing, they operated like new. Old-growth wood is remarkably durable, and the wavy glass adds character that can’t be replicated. Even if you add storm windows for efficiency, the original sashes should stay.
What is the biggest threat to original materials?
Water. Leaks around roofs, gutters, windows, doors, and foundations cause most of the damage that leads to material loss. I’ve seen beautiful plaster ceilings destroyed by a small roof leak that went unnoticed for a season. Moisture also invites rot, insect infestation, and efflorescence in masonry. The best preservation strategy is a dry building: maintain the roof, keep gutters clean, and grade the soil away from the foundation.
Can original materials help date a house?
Yes. Brick type, mortar, nails, glass, plaster, and hardware often provide strong clues to a building’s period of construction and later alterations. A combination of hand-forged nails and lime mortar with shell aggregate, for instance, strongly suggests a late-18th- or early-19th-century date in coastal New England. No single material is definitive, but when you layer several clues together, you can usually narrow the date to within a decade or two. This kind of detective work is one of the most rewarding parts of studying an old house.