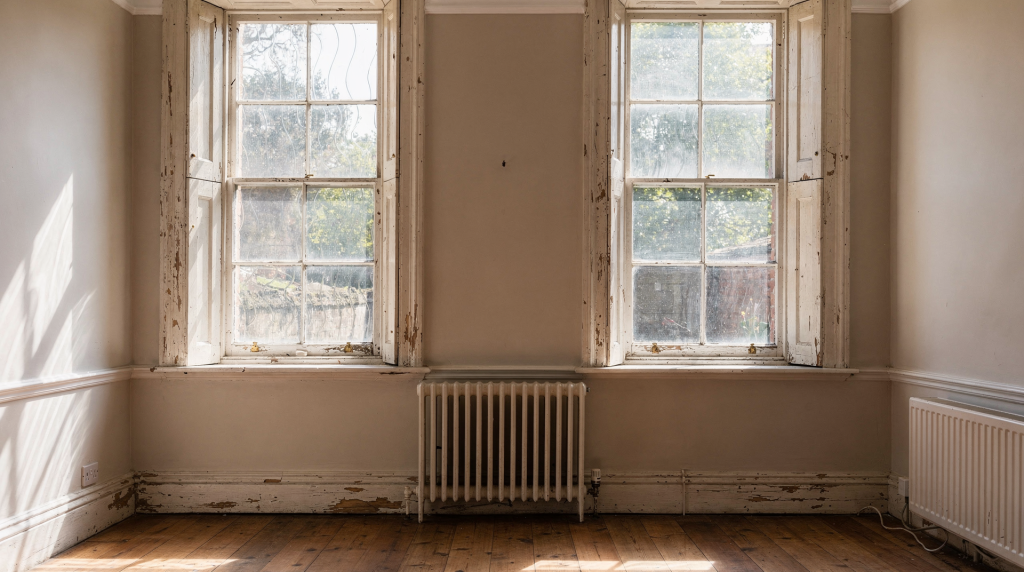
When I walk up to a historic house, my eye goes straight to the windows. Not just because they frame the façade—though they certainly do—but because the glass, the muntin profiles, the way a sash meets its frame, all tell a story about who built the place and when. Original windows are among the most character-defining features of any older building, and they’re almost always more repairable than people assume. The first rule of preservation is simple: retain, repair, and maintain what you have before you even think about replacement. That approach isn’t sentimentality; it’s solid, evidence-based practice.
Why Original Windows Matter
Original windows are not just holes in the wall for light and ventilation. The depth of the frame, the thickness of the muntins, the way the glass catches the light—these details were deliberate choices by the builder. A replacement window with a flat profile or a different glazing pattern can instantly cheapen the look of an entire elevation. Beyond aesthetics, there’s a practical argument that often gets overlooked: old-growth wood sashes, properly maintained, can outlast many modern replacements. I’ve seen windows from the 1840s with only minor sill rot, while a 1990s vinyl unit next to it was already failing. Most deterioration is localized—a soft spot at the bottom rail, a cracked pane, dried-out putty. These are fixable problems, not reasons to throw the whole window away. With careful weatherstripping, reglazing, and wood repair, you can restore original performance without altering the window’s historic appearance.
First Step: Inspect Before You Decide
Before you pick up a putty knife or call a contractor, do a systematic inspection. Walk the house, inside and out, and look at every window as if you’re diagnosing a patient. Where is the damage? Is it in the sash, the frame, the glazing, or the wall around the opening? I always carry a notebook and a camera—documentation is your best tool. Note the condition of paint, putty, wood, and hardware. A window that sticks might just need a cord replaced, not a whole new unit. The goal is to separate cosmetic issues from structural ones and to understand the pattern of deterioration across the house.
What to look for
- Soft or rotten wood, especially at the sill and lower sash rails—these are the first places water collects.
- Glazing putty that’s cracked, missing, or pulling away from the glass; it’s the primary seal against weather.
- Cracked or fogged panes; even a hairline crack can let moisture into the sash.
- Paint that’s peeling or blistering, which often signals trapped moisture underneath.
- Sash that sticks, broken sash cords, or worn balances—these affect operation and can cause further damage if forced.
- Air leaks you can feel with your hand on a windy day; they point to gaps in the meeting rails or around the frame.
- Water stains, rot, or insect damage on the interior wall or sill, indicating a leak that may be coming from above the window.
Create a simple window schedule: photograph each opening, note the condition of sash, frame, glass, and hardware. This record will guide your repair priorities and help you track progress.
Repair vs. Replace: How to Make the Call
Preservation standards are clear: repair first, replace only as a last resort. The table below is a practical guide I’ve used on dozens of projects. It’s based on the idea that most window problems are maintenance issues, not terminal failures.
| Condition | Best approach | Notes |
|---|---|---|
| Peeling paint, drafts, minor rot, loose putty | Repair | Often solvable with maintenance, sealing, and localized wood repair. I’ve seen sashes that looked terrible but needed only an afternoon of epoxy consolidation and new putty. |
| Broken sash cords, sticky operation, worn hardware | Repair | Hardware and moving parts are commonly serviceable; a good hardware restorer can often bring original locks and pulleys back to life. |
| Small areas of decay in a sash or sill | Repair in kind | Dutchman repairs or wood splicing can preserve most of the original material. The key is to cut back to sound wood and fit a new piece with matching grain direction. |
| Broken glass or failed putty | Repair | Reglazing is standard preservation work; it’s one of the first skills I teach new owners. |
| Severe deterioration beyond repair | Limited replacement | Replace only the damaged part when possible, and match original profiles, wood species, and joinery. Even then, I’d exhaust every repair option first. |
If replacement becomes unavoidable, the new work must match the original in size, configuration, material, color, texture, and every visual detail—right down to the muntin profile and the way the glass is bedded. Anything less chips away at the building’s integrity.
Common Repairs That Preserve Original Windows
1. Reglazing and sealing
Reglazing is the bread and butter of window preservation. When the old putty dries out and cracks, it loses its seal, letting water sit against the wood and glass. I remove the failed compound, check the bedding, clean the glass, and apply new glazing putty—traditionally linseed oil-based—tooled to a neat bevel. It’s a simple job that immediately restores weather resistance and, done right, can last decades.
2. Weatherstripping
Weatherstripping is often the single most effective upgrade you can make to an old window without changing its look. I prefer spring bronze or silicone bulb seals that tuck into the existing joinery. They stop drafts, cut down on dust, and make the house noticeably quieter. The trick is to install them so they’re invisible when the window is closed, preserving the original sightlines.
3. Wood consolidation and patch repair
When I find rot, my first instinct isn’t to cut it all out. If the damage is limited, I’ll consolidate the softened wood with a two-part epoxy penetrant, then fill any voids with an epoxy paste. For larger areas, a Dutchman repair—cutting out the decay and splicing in a new piece of wood—preserves the surrounding original material. The goal is always to save as much historic fabric as possible. I match the wood species and grain orientation so the repair blends over time.
4. Sash repair
A sash with loose joints or a cracked rail isn’t necessarily a lost cause. I’ve taken sashes apart, cleaned the old glue, and reassembled them with fresh hide glue and hidden dowels. Broken muntins can be scarfed or replaced in kind. The work is best done on a bench, where you can clamp and align everything precisely. Once repaired, the sash often operates better than it has in fifty years.
5. Hardware restoration
Original hardware—cast-iron pulleys, brass locks, sash lifts—is part of the window’s story. I’ve found maker’s marks on pulleys that date a house more precisely than any document. These pieces can usually be cleaned, lubricated, and put back into service. If a part is missing, I source a period-appropriate replacement rather than a modern generic. It’s a small detail that makes a big difference in how the window feels when you open it.
A Practical Preservation Workflow
Step 1: Document everything
Start with a camera and a notebook. Photograph every window from the outside and inside, capturing the overall condition and close-ups of any damage. Note the type of glass (wavy, cylinder, plate), the hardware, and the paint colors. This record is invaluable for planning repairs and for future owners who will want to know what was original.
Step 2: Prioritize the worst openings
Don’t try to do everything at once. Identify the windows that are actively leaking, won’t open, or have structural issues like a rotted sill that’s letting water into the wall. These are your emergencies. Fix them first to stop ongoing damage, then move to the next tier.
Step 3: Fix moisture problems first
A window repair won’t last if water is still getting in from above. Check the roof overhang, the gutter, the siding, the drip cap above the window. I’ve seen countless sashes ruined because a missing piece of flashing channeled water directly into the frame. Seal the exterior joints, repair any roof or trim leaks, and make sure the window is properly caulked where it meets the wall. Only then start on the sash itself.
Step 4: Repair the sash and frame
Now tackle the window itself. Work from the outside in: repair any rotted wood in the frame and sill, then remove the sash and address broken joints, loose glazing, and worn hardware. Use the least invasive method that will last—epoxy consolidation before cutting, splicing before replacing. Keep the original glass if at all possible; its imperfections are part of the window’s character.
Step 5: Improve performance carefully
With the sash repaired and back in place, add weatherstripping to the meeting rails and the frame. Adjust the sash cords or balances so the window moves smoothly and locks securely. A properly maintained double-hung window from 1880 can be surprisingly tight—often outperforming a cheap replacement that’s ten years old.
Step 6: Finish with proper paint and maintenance
Paint is not just decoration; it’s the primary moisture barrier for wood windows. Use a high-quality primer and topcoat, and make sure to paint the top and bottom edges of the sash—the places most often skipped. Then set a maintenance schedule: inspect annually, touch up paint as needed, and re-putty any cracks before they let water in.
When Replacement Is Actually Necessary
I set a very high bar for replacement. The original component must be so deteriorated that no amount of epoxy, splicing, or shop work can make it structurally sound. Even then, I try to replace only the failed part—a single sash, a sill—rather than the whole window. When a full replacement is the only option, the new window must match the original opening size, sash dimensions, muntin profiles, and glass character. I’ve seen too many projects where a well-meaning owner installed a window with a different number of panes or a thicker frame, and the whole façade lost its rhythm.
Avoid these common mistakes:
- Replacing windows just because they’re drafty—weatherstripping and repair will fix that.
- Ignoring repairable sash or hardware problems until they become emergencies.
- Installing units that change the window proportions, like a shorter sash or a wider muntin.
- Using materials or trim profiles that look visually heavy or flat compared to the originals.
- Removing original glass and hardware without documenting them first; once gone, they’re gone forever.
Energy Efficiency Without Losing Historic Character
There’s a persistent myth that old windows are energy sieves. In reality, a well-maintained original window with tight glazing, good weatherstripping, and a storm panel can approach the thermal performance of a new double-glazed unit—without the landfill waste or the loss of character. Start with air sealing: caulk the perimeter, weatherstrip the sashes, and repair any broken glass. Then consider storms. I prefer interior storms in many cases because they’re invisible from the street and don’t alter the exterior appearance. Exterior storms work well too, as long as they’re designed to match the window’s proportions and are mounted without damaging the frame. The principle is simple: improve performance from the inside out, and never sacrifice the historic fabric that makes the window worth saving.
Checklist for Owners
- Inspect every window and photograph current conditions—this is your baseline.
- Repair moisture sources before touching the windows—fix leaks, gutters, and flashing.
- Re-glaze loose or missing putty to stop water intrusion at the glass.
- Repair rotten wood with localized methods like epoxy consolidation or Dutchman patches.
- Restore sash cords, balances, and original hardware; they’re part of the window’s function and history.
- Add weatherstripping and seal obvious air leaks for immediate comfort gains.
- Repaint exposed wood and maintain coatings regularly—paint is protection.
- Replace only when repair is truly not feasible, and even then, replace only the failed part.
- Match any new work to the original design, proportions, and materials.
FAQ
Can old windows really be more efficient than replacement windows?
Absolutely. I’ve tested this on my own projects. A properly restored wood window with a storm panel can have a U-factor comparable to a mid-range double-glazed window. The key is eliminating air infiltration. Old windows in poor condition leak air, but once you reglaze, weatherstrip, and add a storm, they can be remarkably tight. Plus, the old-growth wood has natural insulative properties that modern softwoods lack.
What part of a historic window usually fails first?
The lower sash takes the most abuse. The bottom rail and sill are constantly exposed to rain splash, so that’s where rot typically starts. Glazing putty fails from UV exposure and thermal movement, letting water sit against the wood. Paint peels at the joints. Hardware like pulleys and cords wear out from use. I always start my inspection at the bottom and work up.
Should I restore all windows at once?
Rarely. Unless you have a large crew and a generous budget, it’s better to phase the work. Tackle the windows that are actively failing—water coming in, sash falling out—then move to the ones that are just drafty or stiff. This spreads the cost and lets you learn as you go. By the time you reach the last window, you’ll be much faster and more confident.
Is it okay to replace just one damaged part?
Yes, and that’s the whole philosophy of preservation. If only the bottom rail is rotted, replace just that rail, not the entire sash. If a single pane is cracked, reglaze that pane. The goal is to intervene as little as possible while solving the problem. This approach preserves the maximum amount of historic material and usually costs less.
How do I know if my window is beyond repair?
It’s a judgment call, but I use a simple rule: if more than 50% of the wood in a critical structural element is gone, and the remaining material can’t hold a repair, it’s time to replace that element. For a sash, if all four corners are rotted and the muntins are crumbling, a new sash may be the only option. But I always document the original thoroughly first—profile templates, glass samples, hardware—so the replacement is an exact replica. Even in a worst-case scenario, the window opening and the historic character can be preserved.
Conclusion
Preserving original windows isn’t a battle between old and new; it’s a choice between thoughtful stewardship and irreversible loss. Every time I repair a sash instead of replacing it, I’m keeping the hand of the original joiner alive in the building. The process is straightforward: inspect thoroughly, repair what can be saved, and only replace when there’s no other option. That discipline protects the house’s architectural integrity, its historical value, and—often—its resale appeal. Windows are the eyes of a house; keep them original, and the whole building looks back at you with its true character.