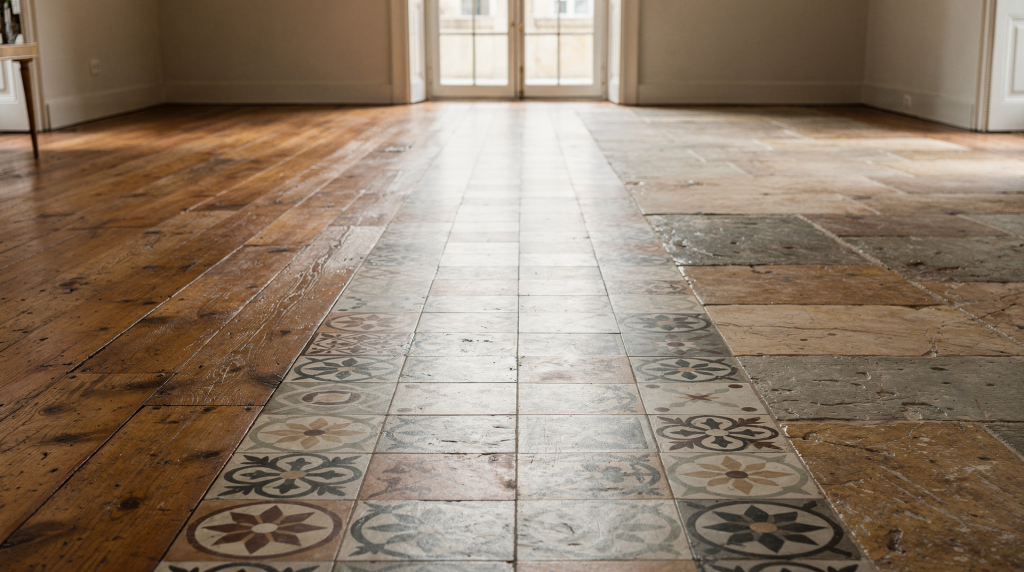
A floor in a historic building is never just a surface. It’s a document: decades of foot traffic, rearrangements, repairs, and successive building campaigns have left their mark. Keeping that evidence intact demands a deliberate approach—clean gently, repair only what truly needs intervention, and whenever you replace something, match the original material and method.
Why historic floors need a different approach
Modern flooring products are often designed for replacement. Historic floors were built to be maintained—and that distinction changes everything. Old wood can be thin, softened by wear, or coated with finishes that react badly to aggressive modern cleaners. Historic tile frequently carries a brittle glaze, sits on a lime-based bedding mortar, and bears the irregularities of hand-pressing; standard “deep cleaning” can be catastrophic here. Stone floors are porous, salt-sensitive, and rely on breathable joints rather than impermeable sealers. The first rule: don’t try to make an old floor behave like a new one.
Start with a simple assessment
Before you clean, refinish, or repair, understand what you’re standing on.
Check the material
Identify the material. Is it solid wood, parquet, painted floorboards, quarry tile, encaustic tile, limestone, slate, marble, or another stone? What are the joints made of—lime mortar, cement, or modern grout? Has the floor been sealed, waxed, painted, sanded, or coated with a modern finish? The answers will shape every decision that follows.
Check the condition
Look for loose boards, cracked tiles, hollow-sounding spots, movement, stains, powdering, and failed joints. Pay special attention to areas near sinks, radiators, exterior doors, and chimneys—water damage often starts there. Note any previous repairs: some are benign, others introduce incompatible materials that create new problems.
Check what not to do
Don’t assume a dirty floor needs aggressive cleaning. Don’t flood the surface to “see what happens.” Don’t sand, grind, or strip coatings until you know the floor’s age and finish history. Rushing into a harsh treatment can erase evidence that took centuries to accumulate.
Historic wood floors: clean, protect, repair
Wood floors are usually the most forgiving historic surface, but they’re also the easiest to overwork.
Routine care for old wood floors
- Sweep with a soft-bristle broom or vacuum using a hard-floor attachment.
- Fit felt pads under furniture legs.
- Keep water to an absolute minimum—a damp cloth should feel almost dry.
- Wipe spills immediately; don’t let moisture linger in the joints.
What to avoid
- Over-wetting the boards
- Steam mops
- Abrasive cleaners
- Sanding as a first response
- Thick modern coatings that trap moisture or erase character
When repair is better than replacement
Repair is usually the right choice when boards are worn but structurally sound, localized rot is confined to one area, finish failure is cosmetic rather than structural, and nail holes, minor splits, or small gaps can be stabilized. Replacement becomes reasonable when boards are beyond repair, decay is widespread, the floor has lost structural integrity, or piecemeal repairs would harm the room more than they help.
Practical repair options
- Refasten loose boards before they start abrading neighboring boards.
- Patch small defects with compatible wood, not filler alone.
- Replace damaged boards with matching species, width, thickness, and profile.
- Preserve original patina where possible; a perfect visual match can look false if the floor is visibly historic.
Finishes for historic wood
If the floor never had a modern finish, use a traditional finish that suits the building. In many old houses, the safest path is to preserve the existing finish rather than strip everything back. If a surface is already finished, test any refinishing plan in an inconspicuous spot first.
Historic tile floors: preserve the glaze, joints, and pattern
Historic tile floors often fail at the joints before the tile itself fails. The goal is to stabilize the floor without washing away the surface character.
Routine care for historic tile
- Sweep or vacuum regularly to remove grit.
- Clean by hand rather than using harsh machines.
- Test cleaners on a small area first.
- Use minimal water.
- Rinse carefully so residue does not remain in joints.
What to avoid
- Bleach
- Household soaps with harsh residues
- Abrasives
- Strong alkaline cleaners
- Over-wetting, which can cause salt issues or loosen tiles
- Polish, unless a specialist confirms it is appropriate
Common tile issues and responses
| Problem | Likely cause | Best first response |
|---|---|---|
| Grimy surface | Dust, grease, old residues | Dry clean first, then mild hand cleaning |
| Loose tile | Failed bedding or grout | Lift only if necessary and reset carefully |
| Cracked grout | Movement or age | Repoint with compatible material |
| Dull appearance | Residue buildup | Test gentle cleaning before any refinishing |
| Hollow sound | Detached bedding | Investigate before damage spreads |
Regrouting and repair
If tiles are loose or joints have failed, the usual approach is to remove damaged mortar carefully and repoint with a compatible mix. For historic floors, compatibility matters as much as strength. A repair that is too hard or too dense can stress surrounding tiles.
Historic stone floors: keep them breathable
Stone floors often survive because they can move, breathe, and age naturally. The wrong maintenance routine can trap moisture or create surface damage that spreads.
Routine care for stone floors
- Sweep or vacuum regularly.
- Wash only occasionally.
- Use minimal amounts of water.
- Use a pH-neutral cleaner only when needed and only if it suits the stone type.
- Let the floor dry fully after cleaning.
What to avoid
- Harsh detergents
- Acidic cleaners on limestone or marble
- Impermeable sealants that trap moisture
- Flooding the floor
- Grinding away surface irregularities without understanding the subfloor
Repairs to stone floors
Isolated loose stones can often be rebedded rather than relaid. Deep chips, holes, and failed joints may be filled with a compatible lime-based mortar. The subfloor should be checked if the stones are moving, because surface repair alone will not solve an instability problem below.
Stains and surface issues
Some stains respond to a gentle cleaning solution or a specialist poultice. Do not assume every stain needs sanding or chemical stripping. With old stone, the safest treatment is often the least dramatic one.
Choosing the right cleaning method
Use the least aggressive method that solves the problem.
| Floor type | Safe routine | Avoid |
|---|---|---|
| Historic wood | Sweep, vacuum, dry dusting, very light damp cleaning | Steam, soaking, abrasive pads, heavy sanding |
| Historic tile | Hand cleaning, small test patch, minimal water | Bleach, polish, harsh alkaline cleaners, flooding |
| Historic stone | Dry cleaning, occasional gentle washing, pH-neutral cleaner if appropriate | Acidic cleaners, impermeable sealants, over-wetting |
Step-by-step: how to plan a floor intervention
- Identify the floor: Confirm the material, age, finish, and joint type.
- Map the damage: Mark loose areas, stains, cracks, movement, and previous repairs.
- Decide the least invasive fix: Ask whether cleaning, spot repair, or localized replacement will solve the issue.
- Test in a hidden area: Any cleaner, finish, or repair material should be tested first.
- Match materials carefully: Use compatible wood, tile, stone, mortar, or finish.
- Preserve evidence of age: Do not erase patina unless it is truly unstable or harmful.
- Document what was done: Keep notes and photos. Future repairs depend on this record.
Common mistakes that damage historic floors
- Using modern “deep clean” products on delicate surfaces
- Sanding first and asking questions later
- Replacing original materials because they look uneven
- Sealing everything to make it easier to mop
- Ignoring movement, which turns a small repair into a structural problem
- Choosing materials that are harder, denser, or less breathable than the original
A simple maintenance checklist
- Sweep or vacuum regularly
- Keep grit off the surface
- Clean spills quickly
- Use water sparingly
- Test products before full use
- Repair loose or cracked sections early
- Match original materials as closely as possible
- Avoid sealing or refinishing unless there is a clear reason
- Reassess any floor that starts to move, cup, hollow, or powder
When to call a specialist
Get expert help if:
- The floor is moving or sinking
- Multiple tiles are loose
- Stone is powdering or flaking
- Wood shows signs of active rot
- Previous repairs are failing across a wide area
- You do not know whether the floor has historic finishes or modern coatings
A good specialist will not rush to replace. They will identify the floor’s behavior, moisture conditions, and original construction before recommending action.
Final thoughts
Preserving historic floors is less about making them look new and more about keeping them stable, readable, and usable. Wood floors need restraint and compatible repairs. Tile floors need gentle cleaning and careful joint work. Stone floors need breathability and minimal intervention.
The best results usually come from simple habits: remove grit, control moisture, fix small problems early, and respect the materials already there. That approach protects both the floor and the building around it.
FAQ
Can I use a steam mop on a historic floor?
No. Steam and excess moisture can damage old wood, loosen tile, and push water into porous stone.
Should I sand a historic wood floor before refinishing?
Only if the floor is sound, the finish history is understood, and sanding will not erase important surface character.
Is wax good for all historic floors?
No. Wax may suit some wood or stone floors in limited cases, but it is not appropriate for every surface and can cause buildup.
How often should I clean a historic tile floor?
Sweep or vacuum regularly and clean only as needed with a gentle, tested method.
What is the safest cleaner for old stone?
There is no single safest cleaner for every stone. The right product depends on the type of stone and its condition; use the mildest option that works.
Should original floorboards always be kept?
Not always, but repair is preferred whenever boards are still repairable. Replace only the parts that are beyond saving.